- Aperture
- See F-stop.
- Aperture Priority
- A shooting mode on modern cameras where the aperture is set to a desired value and the camera automatically determines the shutter speed to properly expose the picture.
- APS-C
- Refers to the size of the optical sensor in digital cameras, or the size of the film’s frame in film cameras. APS-C is approximately 40% smaller than a full frame sensor or 35mm film. (Full size sensors are the same size as 35mm film frames.) What this means, is that with a standard lens on your Digital SLR with an APS-C size sensor you will get 1.6x the focal length of the lens.
- Bokeh
- Refers to the aesthetic quality of the portions of the image that are out of focus.
- Bracketing
- A method of taking multiple pictures with different exposures or settings either for High Definition Photography, or when it is difficult to obtain the proper settings with a single shot . Typically your camera will allow you to set three or more values at which the pictures or taken; for example you may bracket based on f-stop, or even shutter speed with some cameras where holding down the shutter button will take a picture at -1 f-stop, 0 f-stops (properly exposed), and +1 f-stop.
- CMOS Sensor
- The image sensor that has replaced film in modern cameras. The CMOS stands for Complimentary Metal Oxide Semiconductor, and is just one type of sensor modern cameras are using.
- Depth of Field
- A term used to describe the amount of the depth of an area that is in focus in a picture. In other words, a higher depth of field will give more in focus than a lower one given the same subject and picture. The f-stop and lens focal length are just two things that will impact your depth of field.
- DOF
- See Depth of Field
- DSLR
- Digital Single Lens Reflex Camera-See SLR.
- EOS
- Stands for (Electro-Optical System) and is specific to the Canon line of cameras, the EOS camera system was introduced in 1987, and is still in use today.
- Exposure
- Exposure is a general term to indicate the brightness of an image. Something with improper exposure generally does not have a good light distribution, and will lose detail in the darker parts of the image. Similarly, over exposing an image may cause you to lose detail in the brighter parts of the image.
- Film Speed
- See ISO
- Focal Length
- When referencing lenses, this is the distance it takes for light to converge beyond the lens. Subjects inside of the focal length of a lens will have a more shallow depth of field than those outside of it. With a 35mm camera, if you have a lens with a focal length of 35mm, you will capture images at a ratio 1:1 (no zoom, no wide angle). Focal lengths less than the size of your sensor are considered Wide Angle, and greater are considered zoom lenses.
- Focal Ratio
- See F-Stop.
- F-Stop
- Directly correlates to the diameter of the entrance pupil in a lens. The smaller the f-stop, the larger the pupil and more light allowed into the camera as it is expressed in terms of focal length (f/1.4 means focal length divided by 1.4 where 1.4 Is the f-stop). Each increment of an f-stop will reduce the amount of light let in by half! Standard values are: 1.4, 2, 2.8, 4, 5.6, and 8.
- Full-Size Frame
- Typically accepted as a 35mm sensor or 35mm film.
- ISO
- Previously referred to as Film Speed, the ISO used to determine the sensitivity of film to light. The higher the ISO, the less time needed to properly develop the film – even if it was at the expense of a grainy or less defined picture. In modern digital cameras where there is no film, changing to a higher ISO value will instruct the camera to properly expose the image in less time, typically resulting in increased image noise.
- Macro
- A type of photography where the focal distance is extremely small. This typically produces images of subjects at multiple times their original size.
- Relative Aperture
- See F-Stop.
- Shutter Priority
- A shooting mode on modern cameras where the shutter speed is set to a desired value and the camera automatically determines the f-stop to properly expose the picture.
- Shutter Speed
- The speed that the shutter will open and close- giving the exact time that light is allowed to hit the sensor or film. Shutter speeds are typically defined in seconds, so a shutter speed of 1/40 is 1/40th of a second. A faster shutter speed means less light is allowed into the camera.
- SLR
- Stands for Single Lens Reflex. Historically refers to a type of camera where there is a movable mirror between the lens and sensor or film. This mirror allows the viewfinder to see the image as it appears through the lens. When the picture is taken, the mirror flips up before the shutter opens, and falls back into place once it closes if in standard operating mode.
- Vignette
- The visual distortion of the areas around an image historically caused by poor lens optics. Recently, it is done digitally or with specially crafted lenses for artistic effect.
Monday, October 12, 2009
Photography Glossary
Monday, October 5, 2009
Simple Color Enhancement in Photoshop with Lab Color Curves
 Have you ever taken a photo of a particularly stunning sunset or vibrant autumn leaves only to get home and find that the colors are just not quite as bright as you remember them? Well, there's a good reason for that.
Without being too technical, the primary colors of light are red, green, and blue (as opposed to the primary colors of pigment which are cyan, magenta, and yellow). Thus, your color TV, your laptop's LCD, and the HD Jumbotron at Auburn University's Jordan-Hare stadium (war eagle) all use red, green, and blue lights to display any color they want.
So, it stands to reason that when your camera's CCD gathers raw data in red, green, and blue channels that your camera would store the data in RGB format. The problem is, though, that your brain is a little more complicated than this. Your brain adds expectations based on light, shadows, and past experience. So, when your pictures don't look like you remember, that's because the camera doesn't know what your brain said it should look like.
There's an App for That
The good news is that this problem was solved way back in 1931 when the International Commission on Illumination came up with the CIE 1931 color space. This color space has been expounded upon through decades of experimentation and is now generally called Lab (the L stands for lightness; a and b stand for two color-opponent dimensions (long story). This color space was designed to mimic the color distributions of human perception.What does this mean for you? Well, simply put, you can easily adjust your images using a curves adjustment layer in Photoshop. Before I show you how, let me show you a few samples.
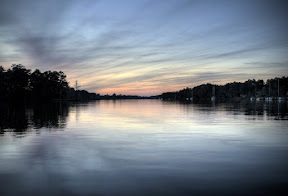
Demonstration
These images have been color enhanced leveraging the Lab color space. To see the original picture, just hover over the image with your mouse cursor.


Using Lab Color Curve Adjustment
You can make Lab adjustments with gimp and there's a Paint.Net plugin too. I may publish instructions for these applications if more people start using them, but here's how you do it in Photoshop.Here's how you do it:
- Open your image
- Click Image >> Mode >> Lab Color
- Click Layer >> New Adjustment Layer >> Curves
- Name your layer and click OK
- Adjust the curve for channel a
- Drag the top right corner in one quarter of the way
- Drag the bottom left corner in one quarter of the way
- If you did it right, the window will look like this:
- Repeat the process for channel b
- Press Ok
- Click Image >> Mode >> RGB to convert it back to RGB color so you can save it

Homework
Once you've got the hang of it, you'll be able to get much more real life color out of your images. As usual, we'd love to see what you have so your homework is to apply this effect to some of your own images. If you see any dramatic results, post them on Picasa or Flickr. Leave us a comment and link to your images. If you see any pictures you think are better without the color enhancement, we'd love to see those too.Friday, October 2, 2009
Adding a Vignette with Photoshop
 Vignetting is any technique that reduces clarity around the corners or edges of an image. Generally, you'll see the vignette as darkened corners and edges around the center of the image. This technique has been used to draw the eye to the center of the picture where the subject will be bright and in sharp focus.
There are several ways to produce vignettes in your own images. For example, using a lens hood that is too long or too narrow for your lens will cause the hood to block some of the light in the periphery. Alternatively, using a lens that is too small for your sensor can produce the same result. There is, however, a vastly easier (and reversible) way to enhance your images with a vignette if you have the right tools.
Demonstration
But, before we get into that, why don't we take a look at a few demos? Both of these images have been enhanced with a vignette. To see the original picture, just hover over the image with your mouse cursor.

How to Add Your Own Vignette
I've tried this with a number of tools including two free image editing packages called gimp and Paint.Net (to be sure, there will be future blog posts about both of these). But, for now . . . the popular one is the very expensive Adobe Photoshop.Here's how you do it:
- Open your image
- Create a new layer (Ctrl + Alt + Shift + N)
- Fill with white (Shift + Backspace)
- Set blend mode to multiply (Alt + Shift + M)
- Select Filter >> Distort >> Lens Correction
- Look at the vignette section and play with the settings in there
- Press Ok
That's it!
Homework
So, that's all there is to it. It's a quick way to add some spice to your pictures. So, here's your homework. Add some vignettes to your own photos. If you see any dramatic results, post them on Picasa or Flickr. Leave us a comment and link to your images. If you see any pictures you think are better without vignette, we'd love to see those too. For bonus points, see if you can create a vignette effect optically and let us know how you did it.
Subscribe to:
Posts (Atom)