 Having completed the introduction to the basic shooting modes in Getting to Know Your Shooting Modes, we're ready to take a look at our first creative mode called Time Priority or Shutter Priority. The indicator for this shooting mode differs from camera to camera and your best bet is to read your manual for your device; however, generally the time priority setting is identified as Tv on Canon cameras or S on Nikon and Sony.
As you probably know, the camera has two ways to control the amount of light that contacts the sensor (whether it is film or digital): shutter speed and aperture. Aperture refers to the size of the opening in the lens and we'll talk a lot more about aperture later when we talk about Depth of Field and portrait photography, but for now just know that your exposure is set primarily by shutter speed and aperture setting.
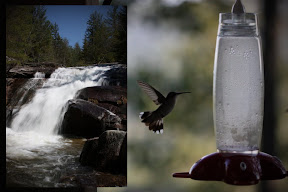
The time priority shooting mode allows you to chose exposure time and the camera will set your aperture for you. This way you can concentrate on how you want motion to appear in your photograph without having to worry about getting the right exposure. In the demo photo above, you can see two different effects you can make with shutter speed.
What's it for?
One thing you might want to do in your photo is capture the feeling of motion in your photo. In the waterfall photo, we wanted the viewer to be able to feel the intensity of the water as it rushes over the smooth rocks and crashes into the pool below. We decided to keep the shutter open longer to let the motion blur of the water appear giving the image the look and feel of being in motion.Another thing you might want to do is freeze time stopping all motion to record an exact moment in time. You might want to catch the exact moment a balloon pops or a water droplet hits the ground. In the demo, we set the shutter speed to about 1/2000th of a second to freeze the rapidly fluttering wings of a hovering hummingbird.
By the way, this is how two of the basic modes work. Sports mode increases your shutter speed (decreases exposure time) to about 1/500th of a second in bright light to stop motion and give you a clear crisp shot of all the action. Night mode decreases shutter speed (increases exposure time) to gather as much light as possible from the background of the night shot. The night shot will also enable the built in flash (if your camera has one). There's a good reason for this; however, we'll be discussing that in a future lesson all about using the flash.
Finally, a long exposure isn't always just for showing motion. Sometimes, a long exposure can bring out a lot of subtle details. For example, a long exposure can help you bring out the vibrant colors of a sunset or sunrise. Just keep in mind that longer exposures will require a tripod to keep them clear. A good rule of thumb is 1 / focal length so if you're shooting at 100mm (effective) then you'll need a tripod for any exposure longer than about 1/100th of a second.
Homework
With that, you have another homework assignment. Set your cameras on Time/Shutter priority and go get some pictures. Put your camera on a tripod (or on anything stable really) and take the same picture twice: once with a fast shutter speed and once with a slow shutter speed. What do you notice about the motion of the objects in the picture? Do you notice anything about the feeling that's conveyed in each? Is there any difference in the colors and clarity of each of the pictures? What happens to the aperture setting (f-stop) as you change your exposure time?Try taking a bunch of handheld shots at different exposure speeds. What's the slowest shutter speed you can use and still get a crisp image? What if you use a tripod?
Take some long exposure night shots. What could you do if you wanted to freeze the action at night? If you want some advanced homework, go out with a friend and try to get some night portraits. What do you notice about objects in the foreground? Try using the flash and a short exposure time. Now, try using the flash and a long exposure time. What happens? Why?
Be sure to put your answers in the comments and share your favorite photos on Picasa or Flickr. Please let us know what you think of our blog and what you'd like us to write about in the future.
The best way to learn is to teach. If you have an idea for a class, write it up and send it to us. If we like it, we'll post it. Be sure to include your name and a link to your organization and/or portfolio.
The Photography Professors
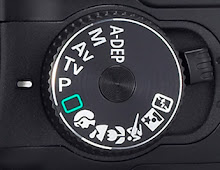 This probably looks familiar to many of you; the shooting mode dial varies from camera to camera but most of them have the same general settings. I'm sure that some of you undoubtedly know what these settings are, but others just dial in the green rectangle for "Automatic Mode" and call it a day.
 Hello there and welcome to the Photography Professors! We're glad you found us and we hope you enjoy our blog. Our goal is to help amateur and professional photographers alike broaden their horizons and learn new tricks and techniques to put in their photography tool kits.